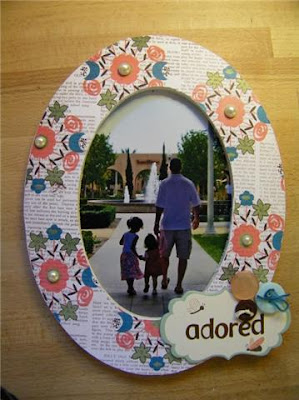
Hello everyone! I am super excited to introduce you to Samantha Sibbet who is a member of our DT here. She has a fun tutorial to share with all of you today! This project is a piece from her gallery this month using October's kit "Arbor Drive." Here is the final product and the steps are listed below it! Seriously cute!
cutting mat
frame
patterned paper
craft knife
glue, I like Beacon's 3 in 1 craft glue 2)Apply glue to the entire front of the frame, be sure to get close to the inside and outside edges. Affix to the backside of patterned paper. Let dry.
 3) Using the craft knife, cut along the inside edge of the frame.
 4) Carefully pull out the patterned paper.
 5)Cut along the outside edge of your frame.
 6) Use a piece of sandpaper or a sanding block to gently sand the edges of the frame.
 7) Use the frame's cardboard backing and a light source to figure out where to cut your photo to fit in the frame. I placed the oval size backer behind my photo and held it up to a desk lamp to find the center. I added a piece of double sided tape to keep it from moving around.
 8)With a craft knife or scissors, cut your photo along the edge of the backer.
  9) Insert the photo and add embellishments! I used a few Prima pearls,
Cosmo Cricket Earth Love chipboard, buttons and Pink Paislee alphas
Tuesday, October 6, 2009
Guest blogger!
1) materials
Posted by Heidi S. at 4:04 PM
Subscribe to:
Post Comments (Atom)

1 comments:
samantha...it's adorable
thanks for sharing it.
Post a Comment